hi everyone...sorry for the late reflection..huhu..such a busy week...(-__-). Ok i have done the class activity using dreamweaver now and because of our laptop got a problem when doing this exercise so we do this exercise in the lab (C14-420)...my group members consist of :
1. Danakorn Nincarean (me)
2. Mohd Hishamuddin Bin Abd Rahman
3. Yahya Mohammed Hashem Al-Dheleai
Step 1: Setup a site
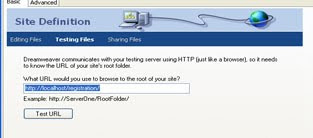
1.We create a new site in Dreamweaver CS3 by follow the note given by lecturer
2.We named our site as "registration" and save it in C:\inetpub\wwwroot\registration\
Step 2: Setup the database file in Access
1.We create a database in Access and insert fields as ID, names, username, password and remarks.
2. For password field, we change it data type to password and for remarks we change to memo.
3. Then we save the database in the folder c:\inetpub\wwwroot\data. The database must save in MS Access 2002-2003 with .mdb file extension.
4. Close Microsoft Acces after done this.
Step 3: Setup the connection
1.In Dreanweaver, we open an ASP page and click Window > Databasesx
2.Click (+)button on the panel and select Custom Connection String from the menu then we complete the option.
3.We named the connection as "dmx" and enter the connection string as "Driver={Microsoft Access Driver (*.mdb)};DBQ="& Server.MapPath("/data/data.mdb"). Click test to test connection to the database and if successful then click ok.
Step 4: Setup the Form
1. We create a new ASP VBScrip page.
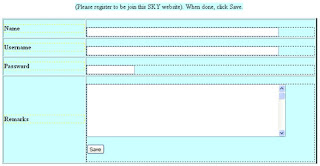
2. Then, we insert a text and textfields for name, username, password and remarks by clicking insert form > Text Field
3.Then we insert a button and named it as "save"
4. For each textbox, we named it as we used in database field.
5. For password textbox, we change it type to "password"
6. Then, we save in C:\inetpub\wwwroot\registration\ and named it as registration.asp
Step 5: Writing a Data into a database using Insert Record
1. We activate Server Behavior and click the (+)button and select Insert Record
2. Then we chose the dmx connection and click OK
3. After that save file.
Step 6: Reading/Viewing a data from a database using Recordset
1. Create a new ASP VBScript page. Then we save as view.asp in C:\inetpub\wwwroot\registration\
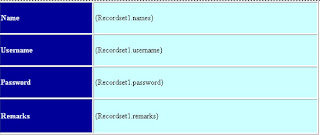
2. Create a table that consist of Name, Username, Password and Remarks
3. Activate Server Behavior tab, click (+) button and select RecordSet(Query).
4. In the dialog box that appear, we select the connection that we created before.
5. In the drop down menu of sort, we choose name as ascending.
6. Then, activate Bindings tab, click (+)button and select RecordSet(Query)
7. Now we can see the Recordset1 and click (+)sign in front of Recordset1 and we can see all the fields that we created in the database-ID, names, usernames, password & remarks.
8.Next we drag each recordset into column of the table that we created in view.asp. for
example : recordset "names" to row of "Name", "username" to row of "User Name" and so on.
9. Then create a line below the table and highlighted it including the table and click (+) button and select Repeat Region.
10. In the Repeat Region window, select RecordSet1 as RecordSet and click a "All Records" then click OK and save the file.
Step 7: Execute the file
1. Open back registration.asp file and double-click "Insert Record Behavior" in Server Behavior Window".
2. Then we added up "view.asp in "After inserting, go to:" section.
3. Next, we saved the file.
4 Then click at Preview in Browser icon. Type any data and click save button. Automatically the view.asp file will be displayed and you can see the data that you typed before in registration form.
5. When everything is ok, we make it more attractive by inserting some images, change font color and etc.
6. Then save the file. Finish...
We named this website as SKY Registration Online. SKY is combination of our names. S for Sham, K for Korn and Y for Yahya...hehe
Monday, September 14, 2009
Friday, September 4, 2009
My Steps...
I realize that all of you can do this practical test and this is my step that i did. But as Ezah want us to share our step i just share it...Don't forget to share your step too.. (^_^)
First step that i did was read the question..hehe.
For the first step, we required to make the application that start with a countdown "1, 2 and 3".
1. First, I created a background and name the layer as "background" and i choose the color that i want.
2. (add new layer)I created the black circle in the middle of the stage as a hover of a number. I named the layer as "circle".
3. (add new layer)Then, i choose the text tool and created number 1 at keyframe 1, number 2 at keyframe 15 and number 3 at keyframe 30 and i named this layer as "number".
4. Then i click at number 1 and break apart it( shortcut to break apart is Ctrl+B).
I Break Apart it twice because it is a text. I did the same step for number 2 and number 3 as well. (break apart it twice)
5.Now working in layer "number". Between the keyframe 1-14, i inserted the shape tweening. I also inserted the shape tweening in frame 15-29. Just click at any frame between those layers and choose shape tweening.
6. Now done with the countdown.
Second Step, the application will automatically presents the title of the application. And the title will zoom from the center of the stage.
1.I add new keyframe at keyframe number 31. Named the layer as "text".
2. I select the text tool and type the word "Animation in Adobe Flash CS3" in the middle of the stage and using font size 12.
3. Select the text then i right click and convert it into symbol and choose "Graphic"
4. I copy the keyframe and paste it to frame 60
5. At frame 60, i resized the text to become bigger.
6. In between the frame 31 t0 60, i select motion tween by right click it and choose motion tween.
Next the application will stop and waiting for users to click a button below the title to move to the next scene and Home button that will bring back a user to the countdown.
1. I created new layer and named it as "Next Button" and insert a keyframe at frame 61. i insert a button to the stage and covert it to button and put the script at the button as below:
on (release) {
gotoAndPlay("Scene 2", 1);
}
2. I add new layer and named it as "Home Button" and insert a keyframe at frame 61. Then insert a button and put the script as
on (release) {
gotoAndPlay(1);
}
3. Add a new layer and named it as "Stop" and insert a keyframe on frame 61 and put the script at that timeline as stop();
For next button, when clicked the application will bring the users to a Yes and No question.
1. I add a new scene-named scene 2
2. I select the text tool and type a question.
3. Add new layer for a button yes and add new layer again for no button. Convert both of it to button.
4. For yes button i put this script:
on (release) {
respon = "Congratulations..you choose the correct answer";
}
5. For no button i put this script:
on (release) {
respon = "Sorry..this is not the correct answer. Try Again";
}
6. Then i add new layer and named it as respon. Then select text tool and select dynamic text from the properties tool. In Var textbox i type in "respon"
7. Add new layer and i named it as coding. At timeline i put this script to register the variables:
stop();
var respon;
respon=""
8. Lastly, i add new layer for home button and i just drag the home button from the library to the keyframe.
And this is my application :
Subscribe to:
Posts (Atom)